Watch more videos on Youtube >>
Wondering how to make an outliner for silk painting borders?
Table of Contents
Making My Own Outliner (instead of Gutta)
For many years I have been using a natural product to create my own outliner, instead of using the traditional Gum-based Gutta (pronounced “Goo-tah”).
It’s possible to buy water-based Gutta, but this is much less expensive and works well for me.
Types of Sodium Alginate
There are two types of sodium alginate (which is usually used in the food industry:
- high viscosity sodium alginate which creates a thicker product
- and low viscosity which helps to create thinner, finer lines (like drawing coloured lines of thickened dye using a gutta applicator bottle) but this does not get as thick as regular Gutta.
Wherever you buy it from, make sure make sure to ask for instructions for their brand.
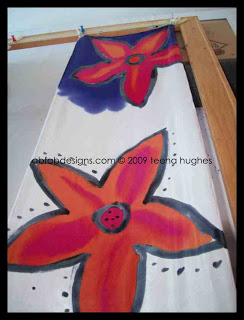
Here is a piece of silk I was working on, using my alginate outliner mixed with black silk dye to create the outlines of the flowers:
Please Note
Most recipes include “chemical water”. I use ordinary tap water instead. It’s up to you to test and work out which one works best for you.
Instructions for preparation
Here is one way to prepare it:
- In a clean jar, add either water, chemical water or silk dye.
- I use 250ml of cold water.
- Sprinkle the alginate – I use 2 level teaspoons.
- Keep mixing non-stop with a plastic spoon until there are no lumps.
- Let it sit for at least an hour or so to continue to thicken before using.
- Don’t let it become too thick if you want to use it in a gutta squeeze bottle.
- If it is too thick, add more water or chemical water.
If you wish to add dye to the mix:
- make sure the mix is as thin as you need for your project before adding a few drops of dye (until it is the colour you need).
- It’s important to do some tests to find mixing quantities you are happy with.
As with all products, this can be affected by temperature, and needs to be kept in a dark space when not being used.
Storage life:
- it depends on the weather, the darkness of the space where it is kept
- I have been able to use mine for weeks after mixing
- I only ever make a batch of half a jar or whatever amount I need for the immediate projects I’m working on.
Removing outliner from the finished silk:
- I use steam-set dyes, I do not use “silk paints” or other types of silk dye
- I leave my silk painting projects overnight before steam-setting
- after the 3 hours of steaming, I let my silk “rest” for at least an hour, to come back to a normal temperature and let the fibres settle down
- the silk is then placed in a lingerie bag and put in the washing machine on a “lingerie” (delicates) setting
- when the cycle finishes, removed the silk straight away
- never leave damp silk for any period of time as the dyes wills start to spread
- if you can still feel the outliner on the silk at this point, it needs to be washed again, and washing by hand (or machine) will help to remove the final traces
- when the washing is finished, the silk is hung inside or away from direct sunlight until it is almost dry, and then ironed.
Do you now understand how to make an outliner for silk painting borders?
Let me know how yours works out – best of luck, and remember to have fun!
PS – if you’d like to hear more of my tips, techniques and training, please sign up here:

If you have any silk painting or other questions, please:
- reach out via email
- post a Comment below
- pop over to my Facebook page >>
- or post a Comment on YouTube >>
Ciao ciao for now!
Love and hugs

Teena Hughes